 I went back and forth on whether or not to post this…I was worried it would come back to bite me to put it out there that I can get a session (not a wedding, let’s clarify) done so quickly. But for me faster editing times don’t really mean getting the photos sent out the quicker it means I am not spending evenings, that could be with people I care about, at the computer. I rarely sat down and did it all at once so my turn around time was usually still around 2-4 days but I did not receive any complaints of waiting for sessions.
So many photographers come out if the holiday season a little jaded of the business and bleary eyed from all the late nights. The digital age has put a new pressure for fast turn around times and it’s only getting faster. The method I use for editing isn’t ground breaking but once I found what worked best for me I have each 1-2 hour holiday session edited in an average of an hour and half including getting it on a gallery/ordering products/etc. I use a phone app to keep up with how long I am working and I pause it during things like converting images and loading since I am away from my desk during those.
If you could use a little more freedom from your computer, consider this process.
Programs You Need
- Adobe Bridge
- Photoshop (Camera Raw)
I believe Lightroom is the most popular editing program right now and I am by no means dead set against it but A) I don’t care for it’s itty bitty slider bars, I don’t know why but they look TINY to me B) I have tried learn it through Youtube and just couldn’t figure it out (anyone wanna volunteer to try to teach me?*Girl raising hand emoji*)
Also my dad began teaching me Photoshop in 2002… Do you know what else I learned in 2002? I have no stinking idea. Any math skills I should have been retaining were replaced with how to swap heads, change the color of clothing, and get rid of acne. All this to say by the time Lightroom came out in 2007 I was stuck in my Ps ways.
- Once the photos are the computer, I open the folder in Adobe Bridge. It usually takes a few minutes to fully load them so I walk away at this point and get something else done. If you have never used Bridge before, know that it does NOT load pictures to their full quality so don’t freak out if they all look a tad blurry.
- Initial culling
Then I start culling. If it was oddly dark or something I MAY go ahead and Command+A to select all and brighten them so I can see what I am working with but usually I just quickly go through and delete out-of-focus, blinkers, or less than ideal composition ones. Once this cull happens I hopefully have close to 100 pictures left since 75-100 is my max goal for 1-2 hour sessions. - I came to realize it’s much faster to shoot to highlight people’s strengths than to have edit out their flaws later.
This is the step that can make or break your time. Striving to get things right in-camera will help you out tremendously. This year my editing became faster when I began shooting in Kelvin for white balance and with a gray card for back up and also made my own basic presets in Camera Raw.
At this point I start opening the photos in batches that have similar exposure in Camera Raw. My goal is to not have to take it all the way to Photoshop if possible. I used to totally be the photographer who said, “Don’t worry I can fix it post,” but the more experience I got I came to realize it’s much faster to shoot to highlight peoples strengths than to have edit out their flaws later. When I have made the adjustments, rather than click save or open image I just click the blue Done button. This makes it easier to go back and make changes later if necessary. - Batch rename
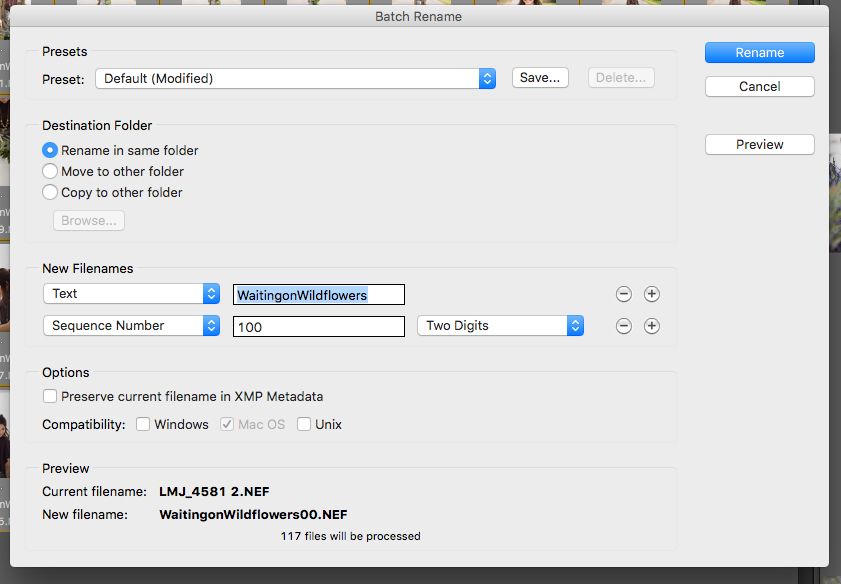
Once I have the session narrowed down to under 100 pictures and edited, I Command+A in Bridge then Tools>Batch Rename. There are many options for this but I keep it simple and do one or two words text and a sequence number. Make sure to give yourself enough digits for the numbers and set the sequence number to begin at “1” not 100!
- Image Processor, your new best friend
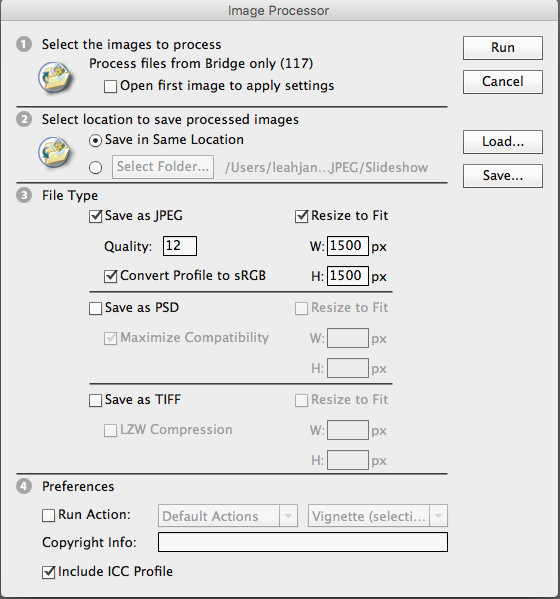
When the photos are renamed, I Select All again in Bridge (or they are all still selected) go to Bridge’s main tool bar and select Tools>Photoshop>Image Processor. At the this point if Photoshop wasn’t already opened it will have to open with a dialogue box. I choose to save in same location because it creates a folder named “Jpeg,” with your newly resized images in it. Other preferences can be chosen based on the session. I knew this particular one would be mostly online/printed small so I kept filesize small. Copyright and other info can also be added here. When your settings are chosen click “Run.” This is another step that takes a few minutes so I typically set my computer to not go to sleep and go accomplish something else (read: I check Instagram)
- You’re Done!
Kinda, this year my process varied. Some were now uploaded to gallery where people then chose products, some were put on jump drives… But the phenomenal part was the longest I spent working on a session in it’s entirety was 1 hour and 46 minutes and that session had an HDR in it so I spent awhile in Photoshop. More than one (I think three) session took under an hour but my average was about an hour and a half.
Technical things that could effect your workflow
- Internet speed for the gallery upload
- Computer processing speed (this is a big one, Step 5 can freeze/crash laptops and slow computers)
Do you have anything tricks to getting sessions done faster (but still keeping up quality)? I am always up for new methods!
Tell me what you think